
Day 4: WordPress Theme, Dashboard & Plugins (Start a Blog in 9 Days)
Set up your blog’s design, learn the dashboard, and add essential plugins.


It’s Day 4 of The Start a Blog Challenge.
Today, we dive into blog design and functionality with the help of some awesome WordPress features.
Before that, though, I’d like to get one simple but critical thing done - securing your website with an SSL certificate.
It may sound complex if you’ve never heard of that, but it really is simpler, and you can get it done in one click from your web host (the example I use is with WPX hosting so the screenshots provided will be from their dashboard. But, of course, you can use any other hosting company that you feel like).
What’s an SSL Certificate?
Every trusted website should have https in their URL. That means it’s secure and has an SSL certificate installed.
SSL means Secure Sockets Layer and is a technology that encrypts your connection to a website so hackers can’t get any of your data.
It’s crucial to have it because if you don’t, you not only risk the payment information of your users, but you’re also destroying your blog’s reputation.
Most of the users won’t buy from websites that don’t have the green padlock before the site’s name. And an SSL certificate gives you exactly that in search engines.
Also, Google officially states that websites that have HTTPS have better preferences than those that don’t have it. If you and your competitor have equally good and functional websites, they will always have a better ranking because of that extra security layer.
Now, let’s add yours.
How to Add n SSL Certificate for Free with WPX Hosting
Log into the WPX dashboard, and click ‘Control Panel’ next to your hosting service.
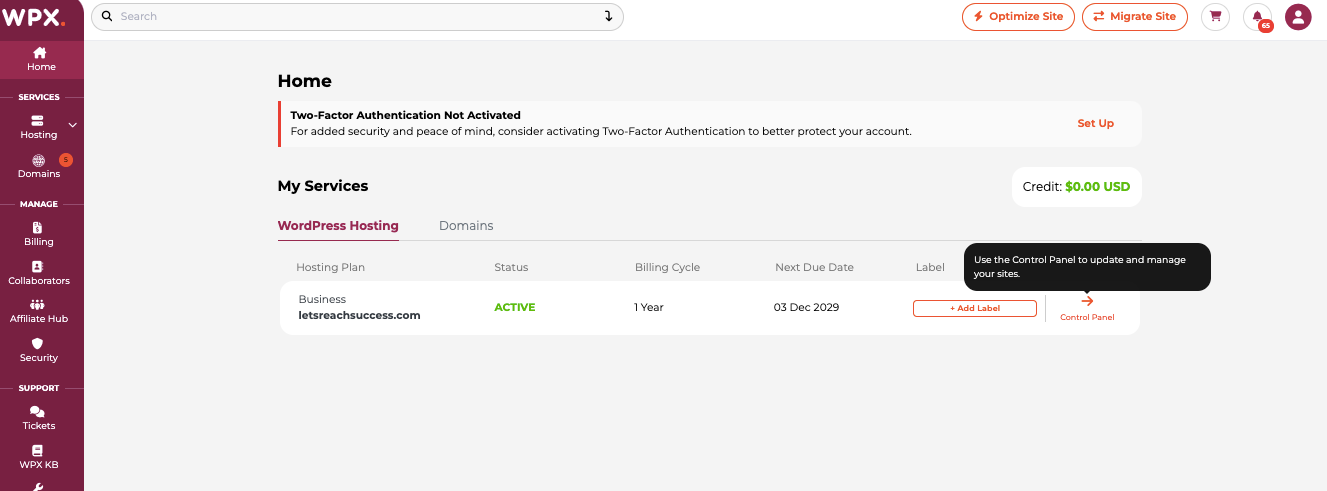
In the additional menu you’ll see on the left, click SSL Certificates.
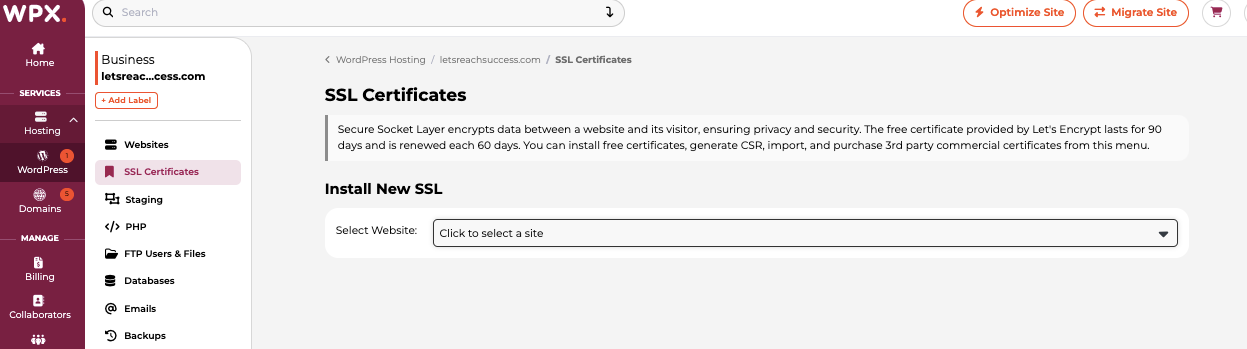
Select your site from the dropdown menu, and click Install.
WPX will then start the installation process and you’ll soon see a message that it’s completed.
The SSL certificate then renews automatically every few months.
Now, before you never need to think about SSL again, there’s one last task to do, but it’s inside your WordPress dashboard.
So head there and go to Settings > General.
This is where you get to write your site title, tagline and add a site icon. Feel free to do that now, it’s an important part of your branding.
And below, you’ll see 2 fields: the WordPress address and the site address. They probably contain the http version of the URLs, but now that your SSL certificate is installed, you can add the extra S. So it becomes HTTPS.
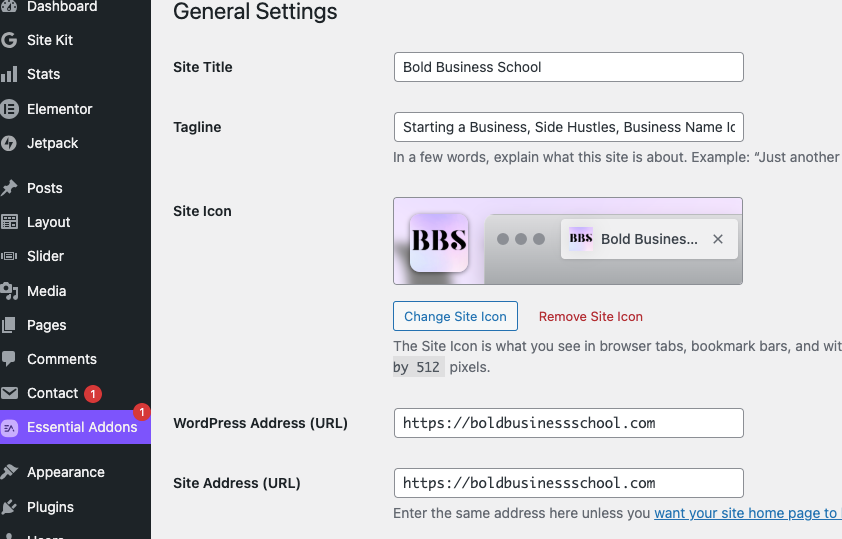
Do that and save the changes on the page.
We can now move onto the next step.
Install Your WordPress Theme
A WordPress theme is a collection of files that determine the overall design, layout, and appearance of your WordPress website. It includes templates for different pages (such as the homepage, single posts, and archives) and stylesheets that control the visual presentation of your site. Themes play a crucial role in shaping the user experience and branding of your website.
Luckily, with WordPress installing a theme takes 1 minute, and you can choose from thousands of beautiful themes (for free!) inside WordPress. How awesome is that!
Just go to Appearance > Themes (inside your WordPress dashboard, in the menu on the left).
Click ‘Add Theme’ on top and you’ll see the WordPress Directory, where you can find over 8,000 free themes you can use for your blog.
Use the feature filter to browse by subject, features or layout.
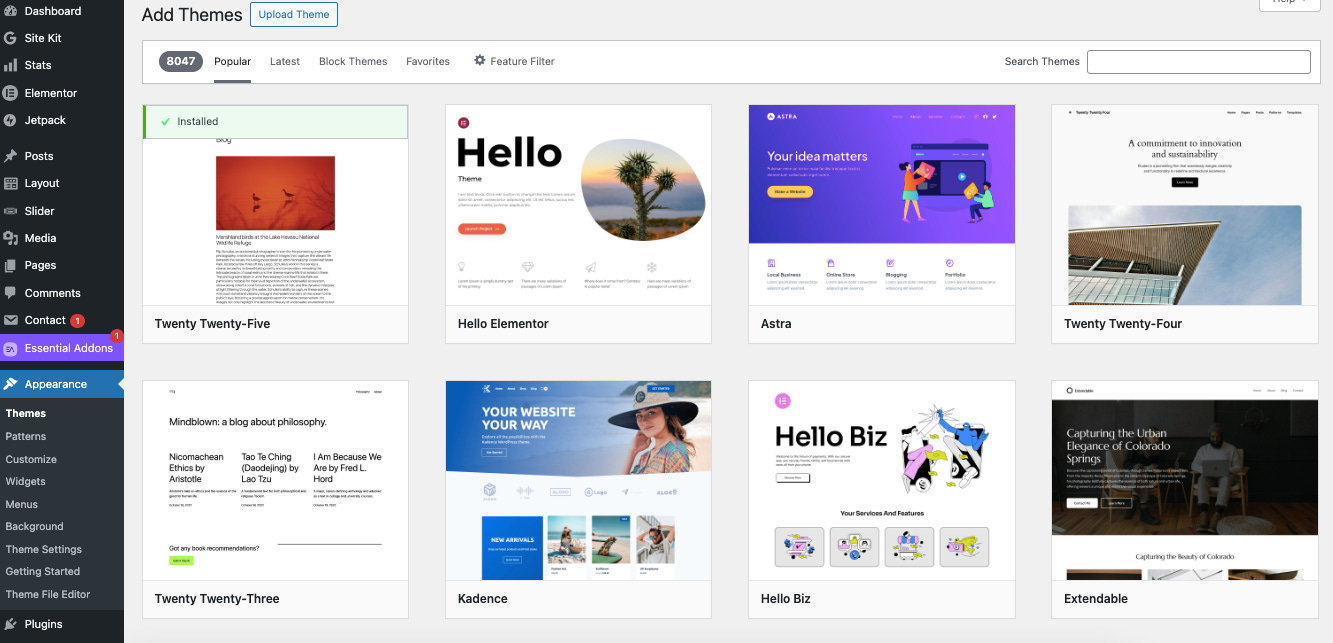
If you’re looking for a good and well-optimized free theme, I recommend Kadence.
If you don’t see it, type the name in the search field. You can then preview it (although you can see its full power by actually customizing your site with it), and then install and activate it.
Customize Your Theme
Themes come with customization options. You can further tailor the appearance of your site by going to “Appearance” and selecting “Customize.” Here, you can adjust settings like colors, fonts, and layout depending on the capabilities of the chosen theme.
Kadence, in particular, goes together with awesome templates that allow you to design your whole site quickly and have brand consistency.
For that, you’ll ned to install a plugin. Plugins on WordPress are how you add new features or functionality to your site, without any code.
There’s a plugin for almost anything (at the end of today’s post, I’ll share a few important ones), and most are free. Just make sure you use a trusted one. Usually, the top ones have millions of downloads.
Now, if you’d like to use Kadence as your theme and make your design process easier with the templates, go to Plugins in your dashboard menu, and click ‘Add Plugin’ on top.
Just like you saw a directory with themes, now you can see one with plugins.
Write Kadence in the search field, and the second plugin that appears contains the starter templates.
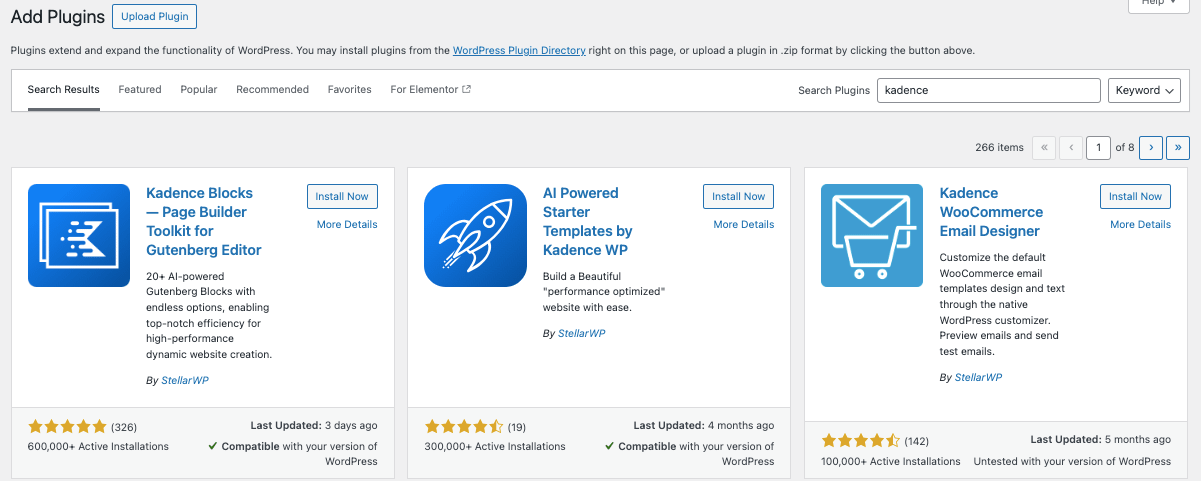
Install it and you can pick a template you like. It will then create the main pages for your blog, and you can just add content to them and personalize them.
Make sure you only do that to a brand new site without any content. If you do it for an existing one, it will overwrite the pages and you might lose your existing ones.
Create a logo.
You can quickly and easily create a beautiful and professional one using Canva.
Choose a logo template, design it (or use one of the many templates they offer and personalize it) and download it.
You can add it to WordPress from Appearance > Customize. Then select Site Identity and upload the logo.
PS, If you want to change your theme at some point, keep in mind that it won’t delete your content, but it might affect the way your content is displayed.
Create Your Menu
A menu is a way to link to all your main pages and provide visitors with easy navigation around your blog. It’s placed in the header and is one of the key elements of your site’s design.
Your navigation menu allows users to quickly see what your site offers and visit any section you’ve added in it.
Once you’ve published your most important pages, you can also create your menu.
Head to Appearance->Menus.
Create a new menu, give it a name, and add your pages.
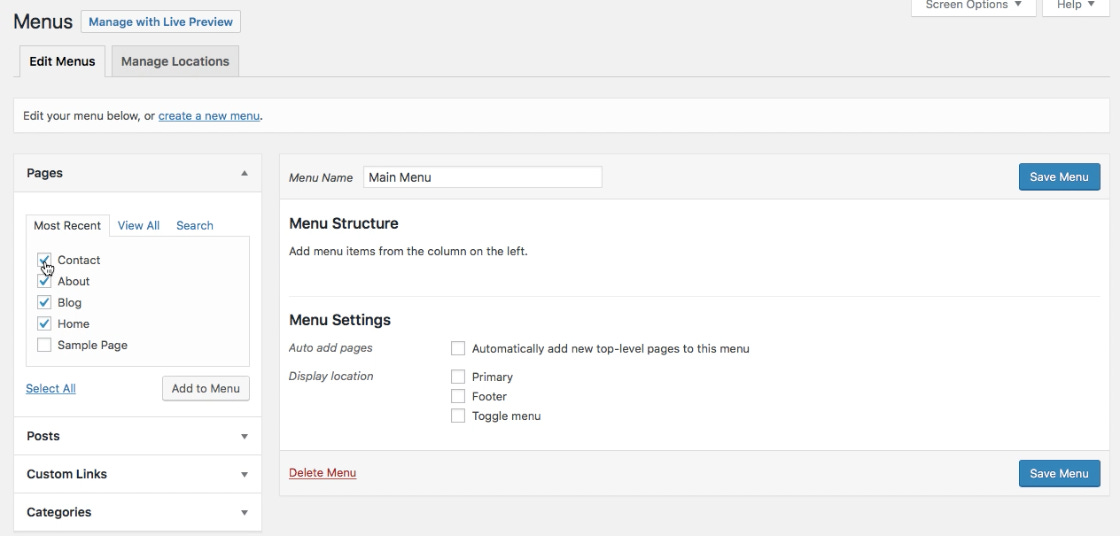
Click ‘Add to Menu’.
Below that, choose the location for your menu. You want it to be your primary one.
Now, save it and your navigation menu is ready.
What your menu will look like also depends on the theme you chose. Here’s how mine looks like for my other blog Blogging with Lidiya, using the free Kadence theme:

Your WordPress Dashboard
As mentioned in Day 3 of the challenge, logging into your WordPress blog happens by heading to https://yourdomainname.com/wp-admin/ and typing your username and password.
What you see once you log in is your WordPress dashboard.
If you’ve never used a content management system like that, or even seen a dashboard, no worries.
Starting a blog was the key step. Using your WordPress dashboard is pretty easy and soon you’ll do all the possible things on WordPress effortlessly.
From now on, and what would possibly become your hobby and main free time activity over the next few weeks, you’ll be creating content and adding widgets and plugins to your site to let it do all the amazing things that it can.
In your dashboard you’ll be seeing general stuff such as your blog traffic, all your posts and pages, comments, and other general info (now not so much, but these will appear once you install some plugins).
On top of the screen is where you can quickly add a page, post, media or else by clicking ‘New’.
What’s important is on the left side of the screen.
There you can access all your posts, pages, media, comments, feedback and users.
The Appearance tab is where the customization happens mostly, in terms of design.
You’ll also find interesting things under Settings.
There are a couple things to do first inside the WP dashboard and in this lesson, I’ll show you what they are.
Simplifying your WP Dashboard.
For a start, let’s organize what you see at a glance once you open your WordPress site (which you might be doing daily from now on).
Here’s what I see the first time I log into a new blog:
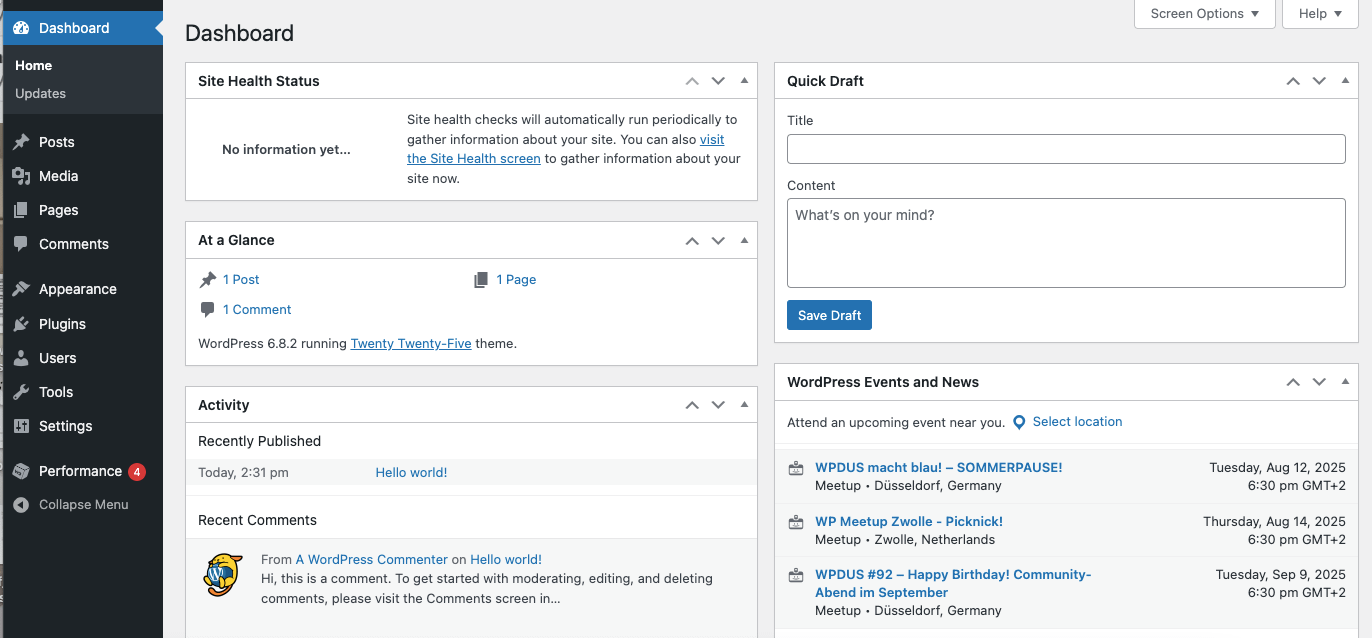
Click Screen Options (on top) and uncheck some of the items that you won’t need.
For me, that would be ‘Activity’, ‘Quick Draft’, and ‘WordPress Events and News’.
Then close that window, and re-arrange the elements that are left by dragging them around.
Here’s my simple layout now:

More will show up on here once you install some WordPress plugins, but now, it’s fine if it’s almost empty.
Update your profile.
The next step is to personalize your profile a bit.
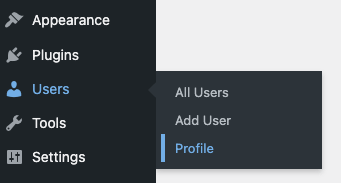
Go to Users > Profile (from the menu on the left) and add some info about yourself.
You can add your first and last name, and choose how you want your name to be displayed. This will be showing on each post written by you so it’s important.
Double check if the email you’ve provide for contact is correct.
Below, you can also add your bio and profile picture.
Publish some blog pages.
Go to Pages (from the menu on the left again).
You can delete the default ones you see there, and then start a new one.
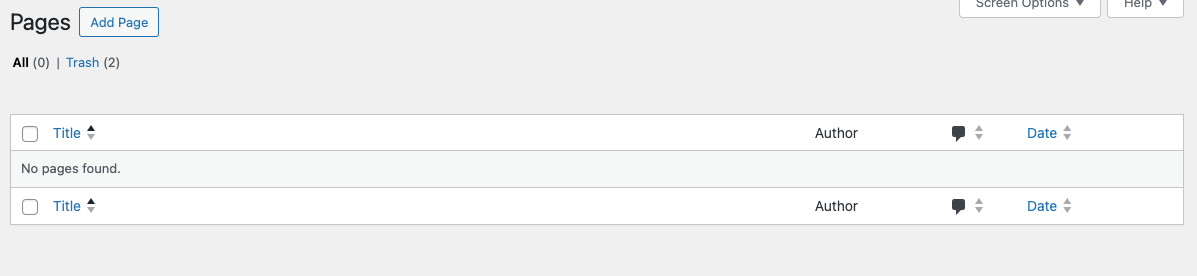
What you’ll see next is the WordPress editor. Give the page a title, and add some content if you feel like (although you can do that later).
For now, let’s just have those first pages published.
Name the first one ‘Home’ and click publish.
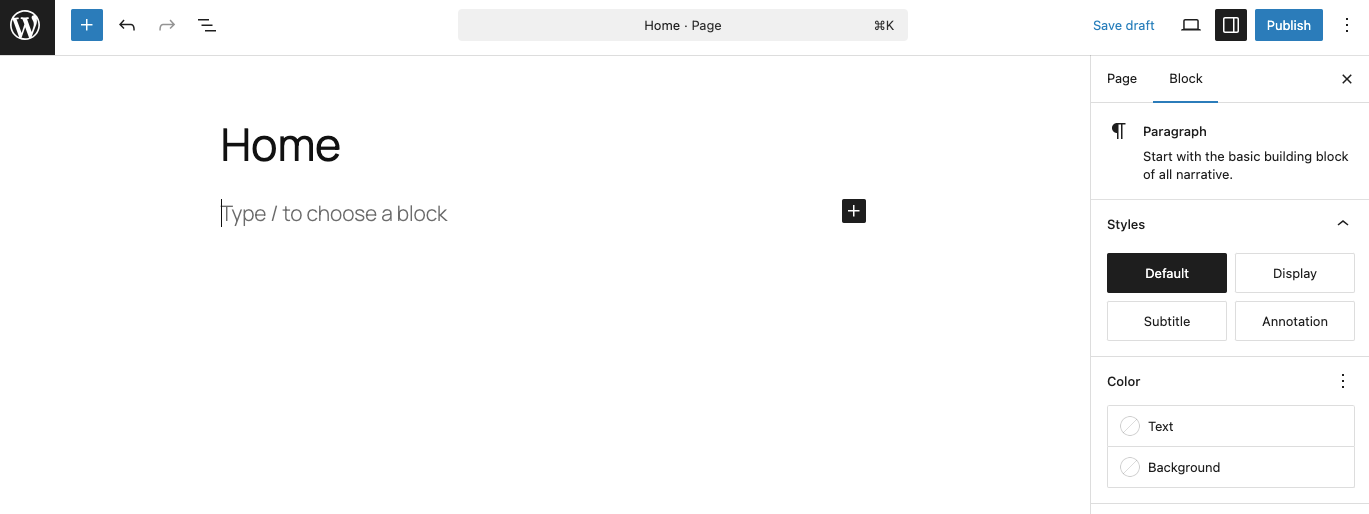
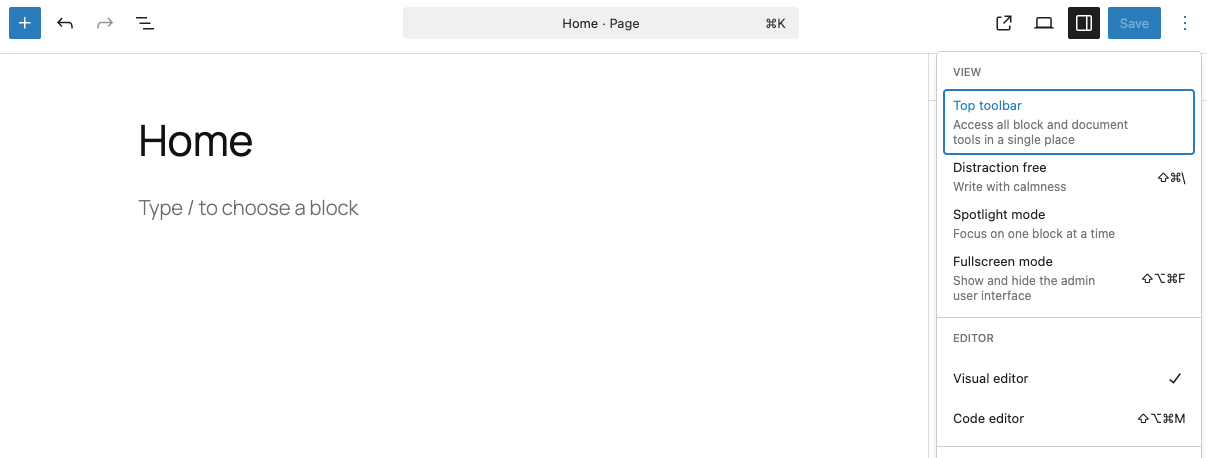
From the 3-dot menu on the top right, you can also choose how you want your editor to look.
There’s a distraction-free option, but I myself prefer to see the menu on the left and top as I often need things from there.
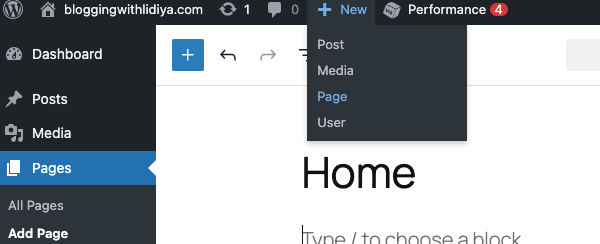
From the top bar, go to New and click Page.
Now name the new one ‘Blog’ and hit Publish. You’ll need it in a bit.
While you’re on this task, you can also create your About page, Contact page, and any other blog page that you’ll be needing soon.
But it can also happen at a later stage, of course.
Set up your homepage and blog page.
Now go to Settings > Reading from the menu on the left. We’ll do something important.
We’ll tell WordPress which page is your homepage so it can treat it as the main page of the site, and which page to display all your new blog posts on.
By default, it’s set to this:
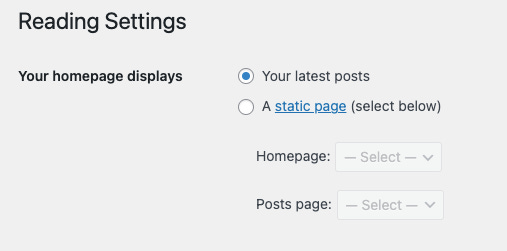
Instead, pick the static page option. And from the dropdown menus, choose Home for the Homepage, and Blog for the Posts Page.
Here’s the final result:
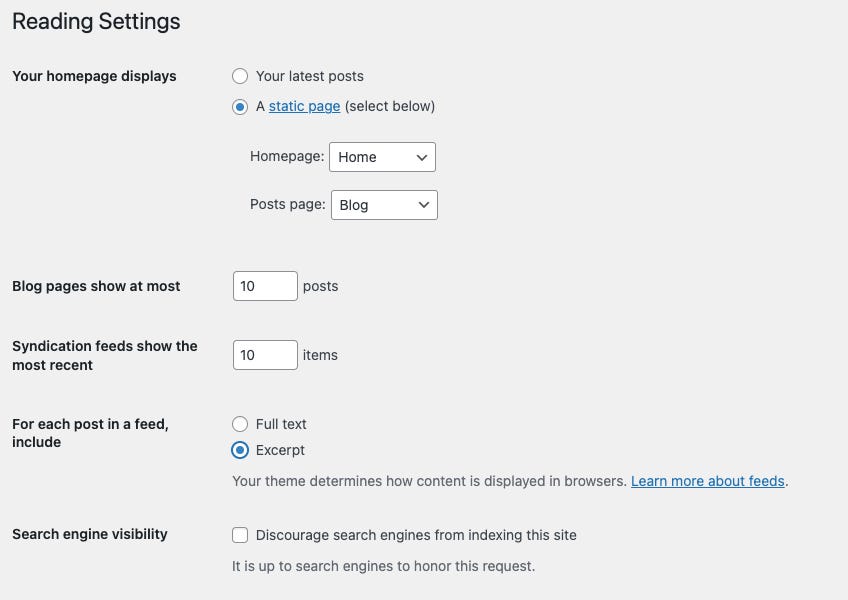
While we’re here, a bit below, you’ll see an option to either choose the full text or except for each post in feed. I’d suggest you choose excerpts instead of full text.
Save the changes and let’s move onto the next step.
Plugins That Make Blogging Easier
After getting your WordPress site up and running, the next step is making it more powerful, secure, and user-friendly.
That’s where plugins come in.
Plugins are like apps for your WordPress site, they add extra features and tools without needing to code. Whether you want to improve your SEO, speed up your site, or make it safer, there’s a plugin for it.
I already showed you how to install a new one, now let me give you a few to add to your blog today:
Jetpack – A multi-purpose plugin with features for security, performance, backups, and site stats;
Wordfence – The #1 security plugin to protect your blog from malware, hackers, and suspicious login attempts;
Hubbub Lite – Adds share buttons so readers can easily share your posts on social media;
A cache plugin – It stores a static version of your site’s pages so they load faster for visitors, instead of reloading everything from scratch each time. This improves site speed, user experience, and even SEO rankings. The top ones are W3 Total Cache, WP Super Cache, WP Rocket and LiteSpeed Cache;
WP-Optimize – Cleans up your database, removes junk files, and keeps your site running smoothly. You can install this one, clean your database, and remove the plugin so it doesn’t take up space;
Yoast SEO – The most popular SEO plugin to help you optimize your blog posts and pages for search engines;
MonsterInsights – Connects your site to Google Analytics so you can track traffic, see what’s working, and make data-driven decisions.
Akismet - The best anti-spam protection to block spam comments and spam in a contact form.
And that’s it.
We did a lot today, didn’t we?
You’re almost ready to start publishing content. That will happen tomorrow with your very first page.
Let me know how today went for you, and ask any questions below.
See you for Day 5,
Lidiya